Dennis Dornon
Hi, I'm Dennis Dornon! As the creator and co-founder of MainWP, my team has helped thousands of web professionals streamline their WordPress maintenance workflow.
We’ve had numerous support questions asking how to set up the MainWP Dashboard locally and in all honesty we would basically say, it is not something we would recommend you doing if you don’t already know how to set up a local server.
The reason for that is that there are so many variables with a local install and not much we can do to offer support to people using them, so we would only recommend that to people who really knew what they were doing.
That changed at WordCamp Tampa 2015 when we were lucky enough to have our sponsor table next to Marc Benzakein from ServerPress which allowed us time to discuss each others products and how they can work together.
ServerPress’ primary product is the DeskTopServer which allows you to quickly create local development sites. The program sets up Apache, MySQL and PHP on your computer automatically for you and adds a new top level domain to your host file “.dev”, these “.dev” sites are only accessible from your computer.
As their site explains it:
Whether you’re a WordPress developer, designer, or website owner, chances are you have accumulated your own stash of tools, plugins, and processes that make your life easier. DesktopServer is a single integrated tool that is proven to save you time testing, developing, managing, and creating fully functional website servers on your own computer.DesktopServer allows you to quickly and easily generate optimized WordPress projects that run locally.
I’ve used DesktopServer for a couple of years but never thought to use it to run the MainWP Dashboard, after some quick testing with Marc, on his laptop, we were able to determine both products are compatible and you can run your MainWP Dashboard directly off your home computer!
If you don’t already have DesktopServer installed you can download the free version from the ServerPress site, for this example the Free DesktopServer Lite product will work fine but if you’re anything like me it will quickly become your favorite way to develop locally and you’ll want to upgrade to the Premium Version.
Once you download the DesktopServer just follow the steps for installing it.
Now that you have DesktopServer installed it’s time to go over getting your MainWP Dashboard set up.
Open xamppliteDesktopServer.exe and you’ll see a screen like below asking you to turn on Apache and MySQL Services.
If using the Premium Version DO NOT turn on AirPlane Mode that will keep your MainWP Dashboard from being able to communicate with your Child sites.
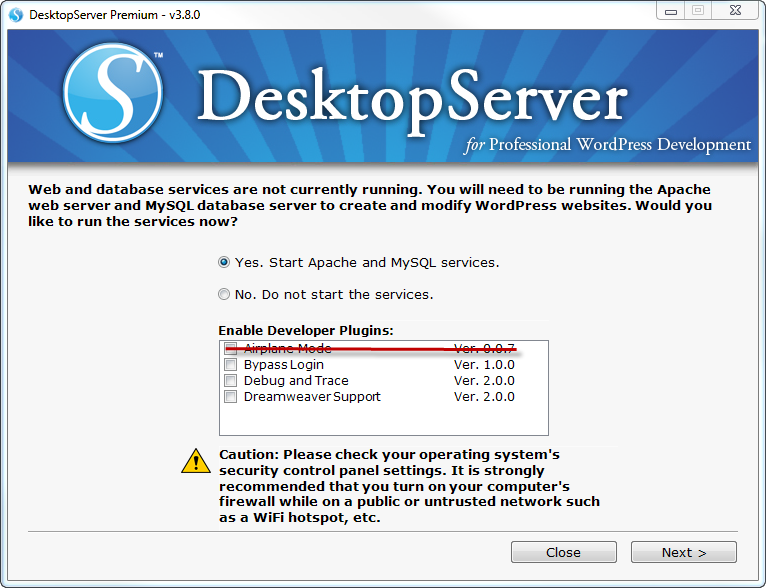
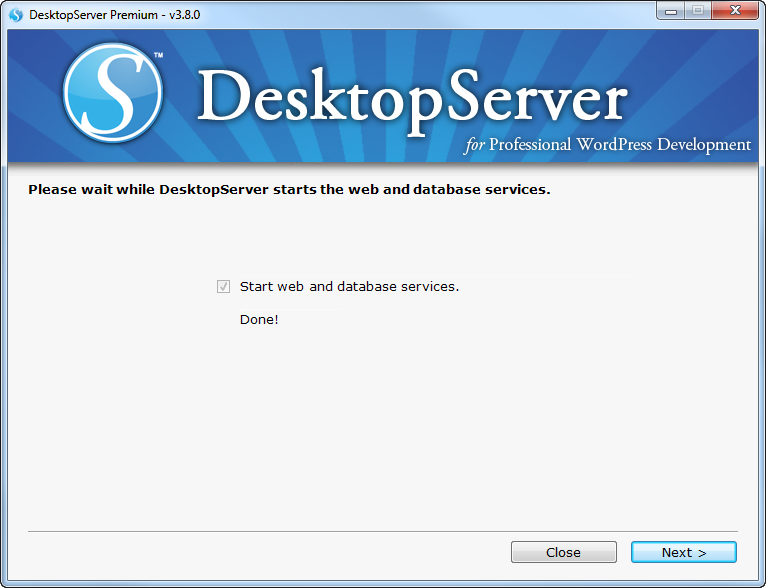
Once you have turned Apache and MySQL Services press the Next Button
Select “Create a new development website”

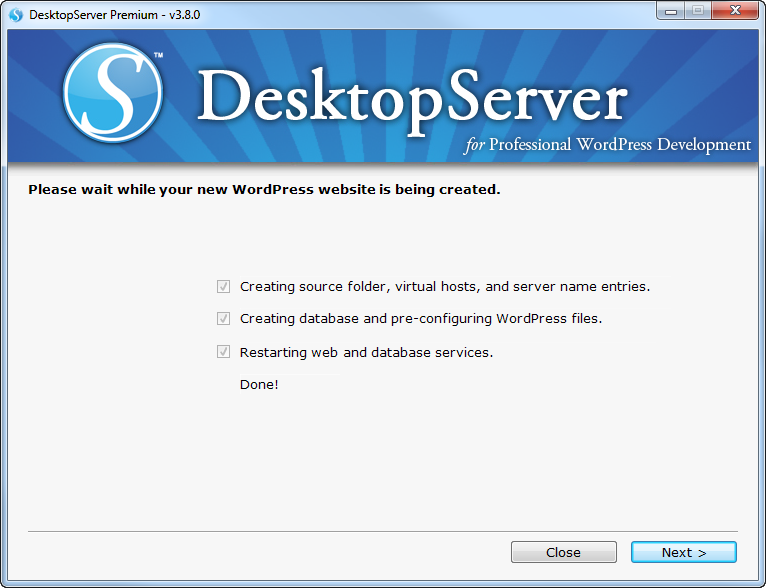
That will bring you to the screen to create your site name in my example I’m going to create Dashboard.dev you can name yours whatever you want.
The DesktopServer will then go through the process of creating the site for you including creating the database and installing WordPress for you. Once that is done press Next.
Once the configuration is complete you’re ready to start setting up your MainWP Dashboard on the site you just created, in my case https://dashboard.dev, Click that link to open up the WordPress install. DesktopServer has done it’s part and will take you back to the main screen.
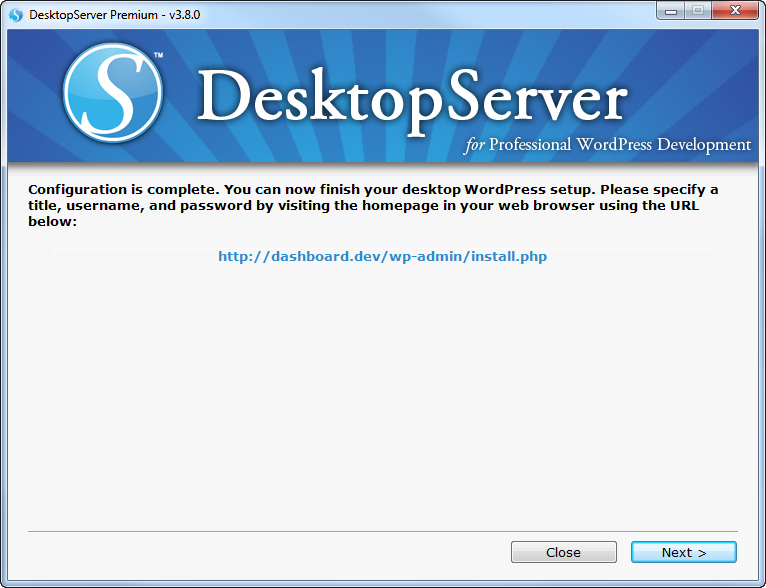
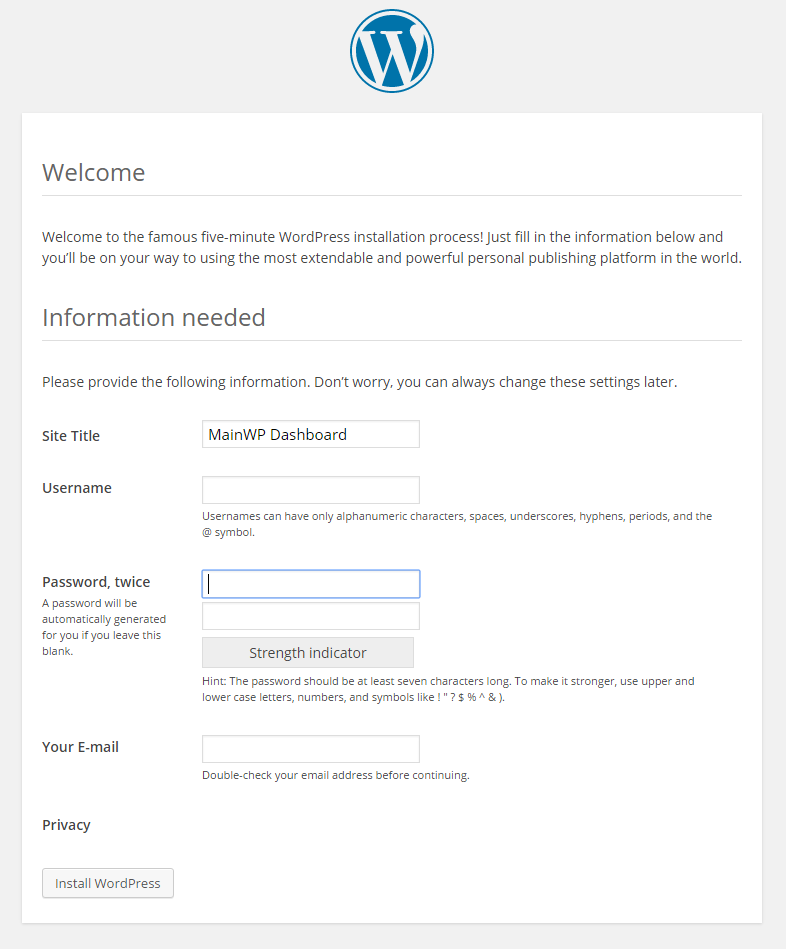
Once you have clicked that link you will be taken to the WordPress install page in my case https://dashboard.dev/wp-admin/install.php
This will bring you through your standard WordPress install pages, just install as normal.
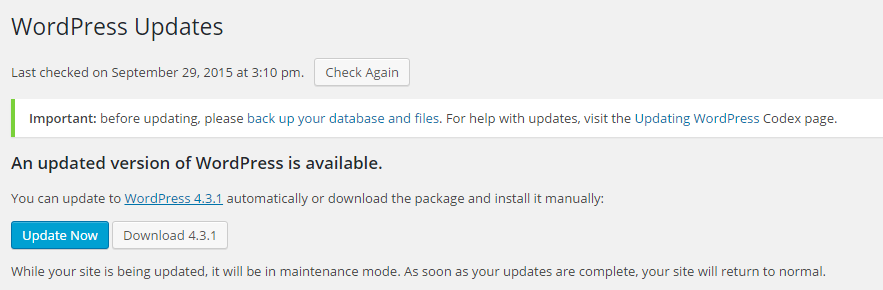
Once you log into your new site you may notice there is a WordPress update available and some default plugin and theme updates so let’s go ahead and update those to clean things up a bit.
After all the defaults are upgraded it’s time to install the MainWP Dashboard plugin so from the Plugin Add screen search for “MainWP Dashboard” select install now and activate.

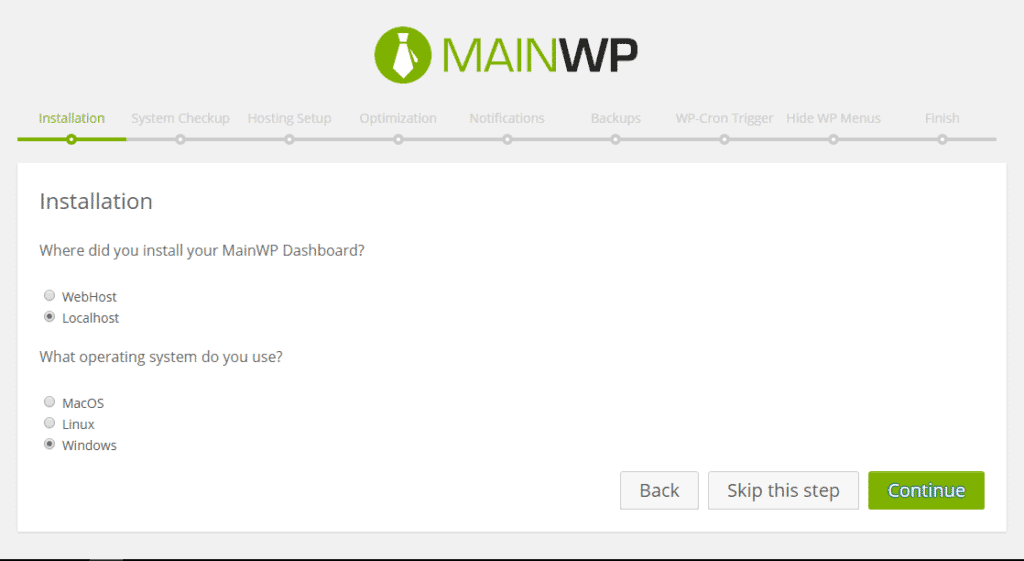
Once the MainWP Dashboard plugin is installed and activated, Quick Setup Wizard will start. One of the first steps will allow you to adjust plugin settings for your localhost environment.
Select “Localhost” and next, select your Operating System.
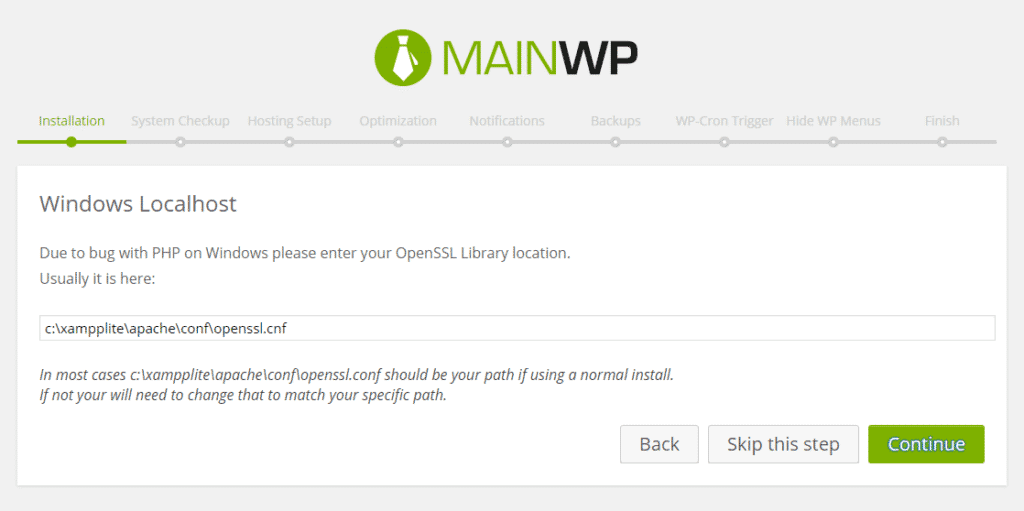
In case you are running the Desktop Server on Windows, you will be prompted to the next step where you need to enter the precise location of the openssl.cnf file on your computer.
In case you skip the Quick Setup Wizard, you can set this manually by tweaking one of the MainWP Dashboard core files.
Note: This needs to be done only if you are using Windows operating system AND you skipped the Quick Start module (from above)
Open yourinstallpathdashboard.dev/wp-content/plugins/mainwp/view/view-mainwp-manage-sites-view.php
Near line 1726 find:
$conf = array('private_key_bits' => 384);
and change it to:
$conf = array('private_key_bits' => 384, 'config' => "c:\xampplite\apache\conf\openssl.cnf");
c:\xampplite\apache\conf\
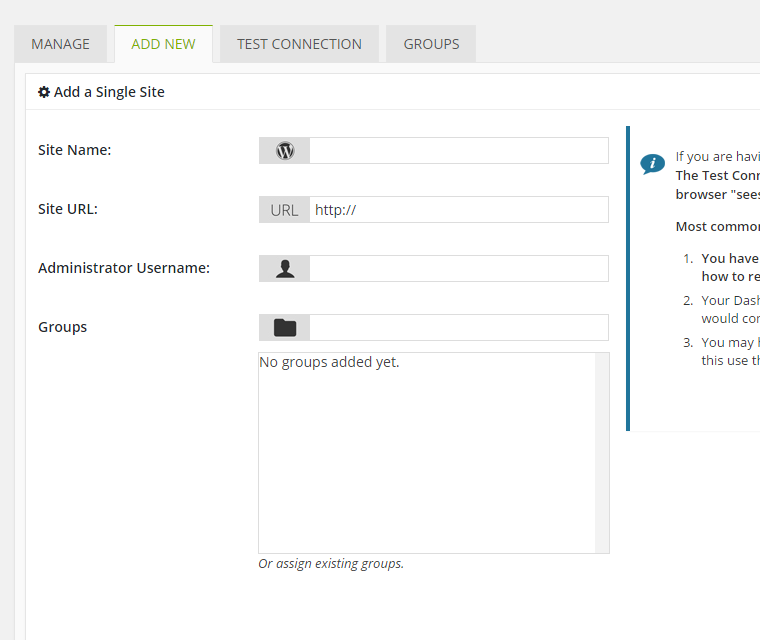
Once you have completed those steps you can add your first site
That’s it! Your Dashboard is now ready to be run directly from your local computer.
If your computer or DesktopServer is turned off automated processes will not run.
If you decide to keep things on all the time and rely on the automated processes then you will need to setup local crons following these directions since wp-cron will not be triggered by anyone visiting your site.
Manage Unlimited WordPress Sites from One Dashboard!
10 comments
mahendra
Thanks for the information… This is actually new to me.. can you please provide desktop server installation guide.
Bogdan
Here is the Installation Guide:
http://docs.serverpress.com/article/44-installing-desktopserver
Purnendu
Hi,
Just wondering, will it manage sites from the Internet or just the ones on my localhost only ? If it is the sites from Internet then I can use the “massive” resources of my computer to manage the sites without worrying about Shared Hosting/ VPS etc
Thanks
Puru
Bogdan
If you set your Dashboard on you localhost, you will be able to connect your live sites that are hosted on a Webserver.
Wayne
Hi I have followed instructions to the letter and everytime i try to add a site i keep getting ‘Invalid Request’
Any Ideas?
Many Thanks
Bogdan
If you go to the MainWP > Server Information page, can you please check the SSL Warning check and let me know if it shows you a warning?
izenesis
Yes. I get this :
error:02001003:system library:fopen:No such process
Bogdan
That means that the openssl.cnf file can’t be found and OpenSSL extension is not working properly. Can you please try following: Go to the MainWP > Settings > Tools page and start the MainWP Quick Setup Wizard. On the first step, select Localhost and Windows, proceed to the next step. In the field where you need to enter the location of the openssl.cnf file, verify that the correct path has been set and please make sure that the file extension is .cnf (I have seen that in some cases, users used .conf instead and that caused the issue). Once that is done, proceed to the next step. From here, you can complete the setup or to skip next steps.
Please let me know if that helped.
izenesis
Perfect ! Changing the file extension to .cnf worked. Thanks a lot !
Since it is running on my local, there is no SSL to the Main WP install. Will the connection be safe ? Do you suggest anything here ?
izenesis
Same here. Keep getting invalid request error when trying to add a new site
Comments are closed.