Todd Jones
Along with being the resident writer for MainWP and content hacker at Copyflight, I specialize in writing about startups, entrepreneurs, social media, WordPress and inbound marketing topics.

As a WordPress entrepreneur, you have probably seen or read about the use of blogging for your business. The professional name for blogging is content marketing.
Do you stare blankly at the screen when you try to write a blog post?
Are you struggling to develop a process for writing a blog post?
The truth is, it takes hard work and some planning to write blog posts for your WordPress business.
After all, you are a developer, not a writer.
However, you have some incredible knowledge to share with your customers and other potential customers.
Don’t neglect to share your wisdom.
Start writing!
Below, I have outlined a super easy process to blogging method.
Caveat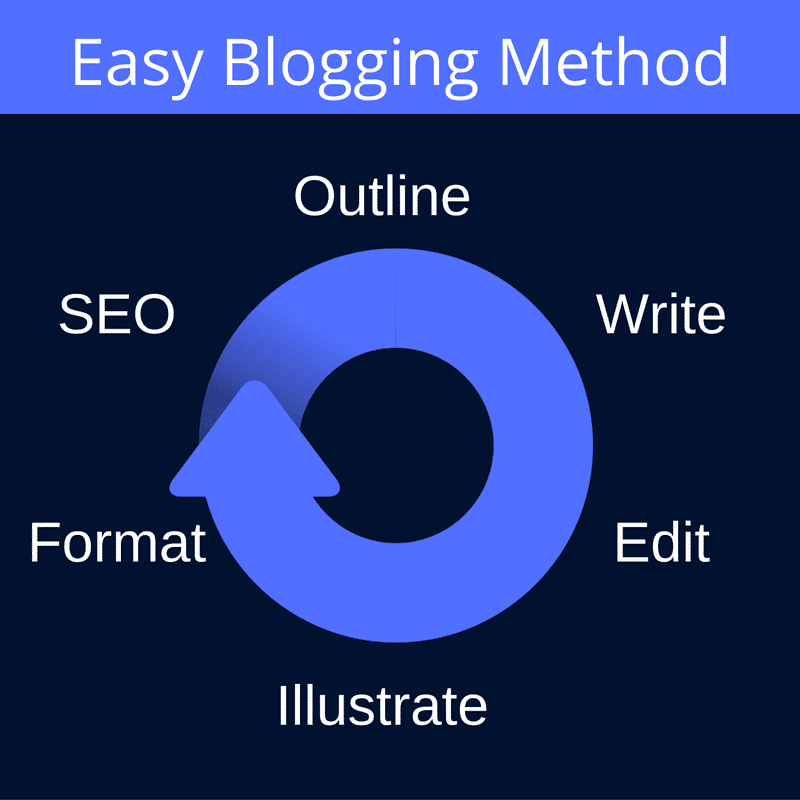
This method does assume you have tools and, most importantly, topics to discuss. In other words, there is a beginning and ending. Once you have finished your process, you are ready to publish the post. Publishing and promoting is not included in the process, but it is important for your content strategy.
Here is a simple blogging process:
Each is explained more fully below.
The first step of this process is to make an outline. Even if you aren’t completely sure the direction you want the article to go, make an outline, you can always adjust later.
Sometimes, I use a standard outline that I will guide my thoughts along.
A great blog post starts with an outline. An outline helps your article be more clear and concise and move in a determined direction. Not using an outline will cause the post to move aimlessly and seem like rambling.
There is a time and place for aimless rambling, but in most blog posts, it is better to have a point and move in a single director so not to confuse the reader.
Many outlines pay attention to the body of the post, but make sure to put time and effort into your introduction and your conclusion. A very simple outline is to have an Introduction, the Body of the post, and the conclusion.
The next step is to write your content.
When writing, I find it best to write and not worry about editing the post. That is easier said than done.
To help me, I write different sections of my blog post (remember, there is an outline) in Notepad (Windows) which does not have formatting or a spellchecker. It helps me to focus only on what I am writing. I know I can go back and edit at a later point.
I write section to section so that I am not distracted about the post as a whole. I am a big picture guy and focusing only on a section in Notepad helps me only be concerned with that section only.
Once I have completed the section of my outline, I post it in a new document in Google Drive which serves as my first draft.
Next, edit your post. Editing is an important task. If you need an extra set of eyes, share your document with someone who can look it over and point out any obvious problems.
You need to wait before editing your post if you are self-editing. This gives you a break from looking at the content and a better chance at having fresh eyes.
After I have added all my sections into my first draft, I double check the draft to see if it make sense overall. I utilize my spellchecker because I am a little OCD, and it drives me nuts to see the little red lines under various words.
I then re-read each section to see if wording needs to be changed.
Then, I use my secret sauce.
I copy my post and drop it into my Grammarly app. Then I argue with the app about what I am trying to say. I tweak my sentences and words to make it read better.
If I am really struggling with the article, I will also copy to my Hemingway App. I will argue with the Hemingway App too, about what the copy should be and how it should read.
At this point, I will put the article back into a fresh Google Drive document as an edited draft. I also include links in the area where they should go for the blog post.
Resources:
https://www.problogger.net/9-crucial-tips-for-self-editing-your-blog-posts-that-every-blogger-can-use/
https://smartblogger.com/editing-tips/
Next up, create or find images or graphics.
Images and graphics add value to the article.
The first image will be for a featured image. If I am writing for a client, I will usually create the image in Canva and, sometimes, use the client’s logo in the graphic.
I typically use Canva to make this work. If I need an image, I will either purchase one from Canva, find one one Morguefile or Unsplash, or purchase on from iStock. I will also find images that I may have taken that may work.
If the post is a how-to article, I include screenshots at the appropriate places.
Make sure you purchase or use images or graphics that have permission for reuse.
The format is more important than you might think. Once you have written your article and dropped it into the WordPress editor, it is time to do your formatting.
If you formatted your post in your favorite word processor, you can copy and paste it in the editor already formatted.
If you are like me and don’t want the extra tags and other types of code, you can drop the text into the Text tab of WordPress and use the formatting features of the WordPress editor.
There are some important things to keep in mind when formatting.
People skim much more than they actually read. Therefore, it is best to have lots of whitespace built into your blog post. Reading on a computer isn’t always easy. Therefore, the whitespace helps users not to be overwhelmed by text.
https://www.successfulblogging.com/16-rules-of-blog-writing-which-ones-are-you-breaking/
Take advantage of formatting features such as short paragraphs, blockquotes, and images.
Use subheadings. And when you use subheadings, make sure to wrap them in an H tag. Use hierarchy when doing so. Start your subheadings with <H2> and using <H3> and so on for each subsequent subheading.
Looking for more info formatting blog posts? Check out these articles:
https://writtent.com/blog/format-perfect-blog-post-10-tips/
https://www.successfulblogging.com/16-rules-of-blog-writing-which-ones-are-you-breaking/
https://contentmarketinginstitute.com/2010/06/12-tips-for-formatting-better-blog-posts/
https://www.searchenginejournal.com/appearance-matters-how-to-format-your-blog-posts-for-social-linkbait-success/49116/
https://www.copyblogger.com/formatting-wordpress-posts/
Search Engine Optimization is a uniquely complicated task. There are many variables to making sure your site is optimized. However, one thing you can do fairly easily is to make sure your posts are SEO optimized.
With WordPress, there are a couple of popular options to make sure your blog post is properly optimized for SEO.
Yoast’s SEO plugin and the All in One SEO Pack are the two most popular SEO plugins.
It is important to note that each plugin has a ton of useful features and options that you should utilize before you ever get to optimizing individual posts.
The good thing about each is that they are fairly easy to follow. Essentially, they have guideposts that you follow to make sure each article is following recommended techniques.
Some fairly basic tasks include being consistent with your keyword in your title, your snippet preview, and in your article. Having your keyword placed in the article and subheadings will also help. With the changes in how Google recommend keywords, it isn’t as important that the exact keyword is strung throughout the post as Google now recognizes user intent more that before.
It is important that Google knows what you are writing about, and Google lets you tell them. Thanks, Google!
Using SEO by Yoast
https://yoast.com/wordpress-seo/#individual-posts
All in One SEO Pack Guide
https://www.wpbeginner.com/plugins/users-guide-for-all-in-one-seo-pack/
https://semperplugins.com/documentation/quick-start-guide/5/
Having a process helps you write blog posts faster and with greater precision. A process allows you to know where to start, where you are going and where you will finish.
Process keep us on track.
Random writing may be more interesting, but for business, random becomes, just random. Blogging for a business needs to have a process as much as building a website for a client, billing or launching a website.
It helps you get the project finished.
Manage Unlimited WordPress Sites from One Dashboard!