Todd Jones
Along with being the resident writer for MainWP and content hacker at Copyflight, I specialize in writing about startups, entrepreneurs, social media, WordPress and inbound marketing topics.

Have you used the MainWP Client Reports feature? In this article, we are going to give you the information you need to get started using the client report feature to update your customers.
As we started with the article, the following are links you will want to bookmark. Additionally, I leaned heavily on information from Joshua Vandercar, his article, and his sample report. Thanks, Joshua for the help!
Resources:
Prerequisite
It should be noted that you have the MainWP Dashboard installed and running, MainWP Child Plugin on your client’s sites, the free MainWP Child Reports Plugin on your child sites, and the Client Report Extension installed on your dashboard.
The MainWP Client Report Extension comes with the MainWP Pro plan.
To get started, you are going to need to follow seven steps.
First, you will need to make sure you have installed your MainWP Child Plugin, MainWP Client Reports Plugin, and have the MainWP Client Reports Extension installed on your MainWP Dashboard. Note that the MainWP Client Reports Plugin and the MainWP Clients Report Extension are two different applications.
You will need each application. You likely already have the MainWP Child Plugin and your MainWP Dashboard setup, so you will need to be sure to have the reports plugin installed on each site you run reports as well as the extension on your dashboard.
According to Vandercar, “By default, he MainWP Child Reports plugins is set to keep records for 180 days. If folks plan to send yearly reports, they must up that number to 400 or so in order for reports to reflect accurate numbers for the year.”
Vandercar also pointed out that the data starts collecting for the Child Reports plugin once it is installed on the child site. Your reports will show little if any data if it hasn’t been installed for very long.
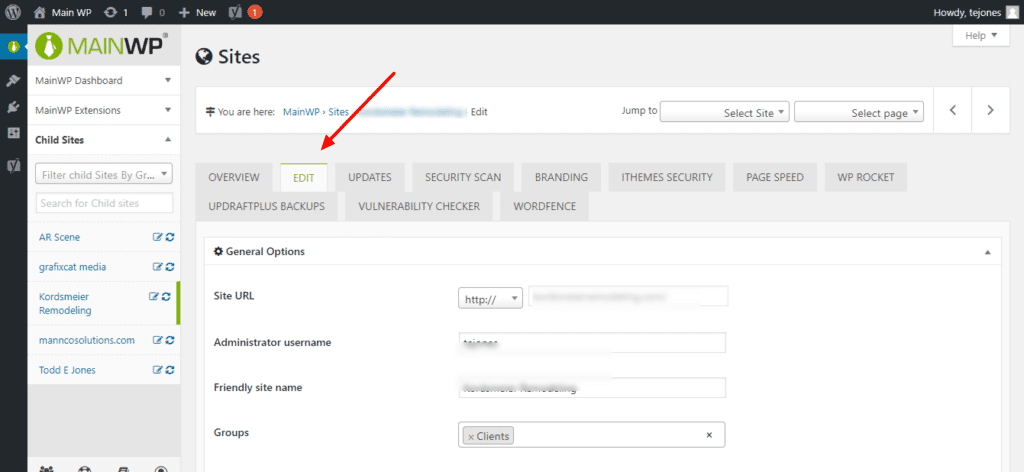
This can be a forgotten step, but it should be done early. For each site, you have a place to set the tokens. You will want to navigate to each child site and click the tab for “Edit.” From there, at the bottom of the page, you can set the unique information for each token.
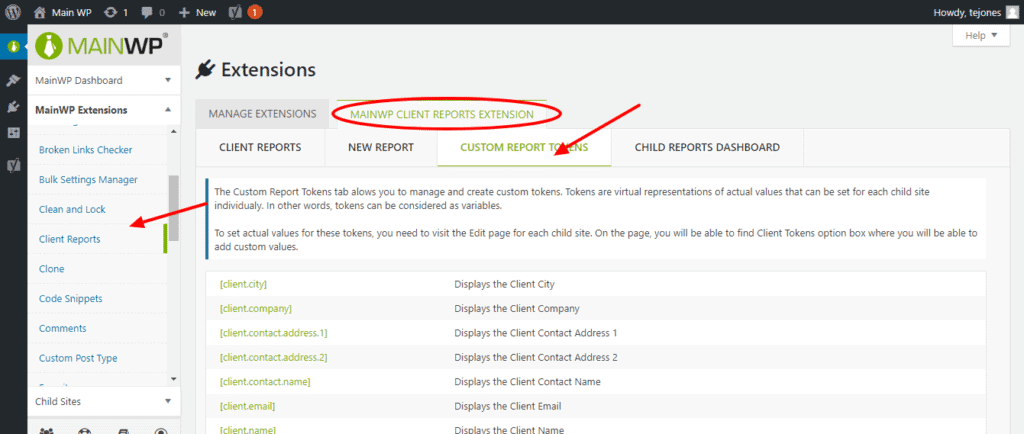
If you are using Joshua’s report, you will want to set your custom tokens. This applies if you are creating your report from scratch and you are wanting to add custom reporting information. For example, Joshua uses [client.logo.url] to display his client’s logo in the report. There is no default token for this, so you have to create the custom token.
To do this, you will want to visit the Client Reports Extension, click on the tab for Custom Report Tokens
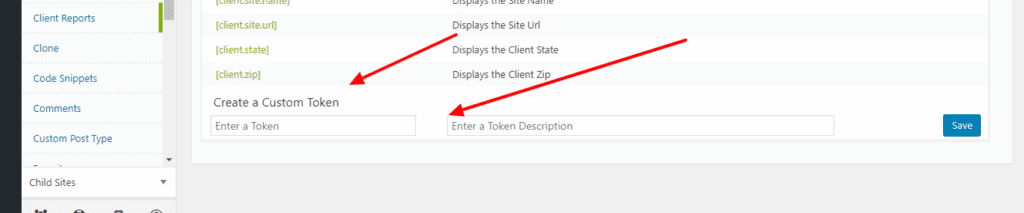
Once on this tab, proceed to the bottom of the page and fill in your details.
By default, the Client Report Extension comes with three reports which you can use to implement quickly. There is the Default Basic Report, the Default Full Report, and the MainWP Client Report.
Each report provides different information. The MainWP Client Report provides much more information and looks a little nicer. Think of each as a template.
From there, you can create your reports – see: > Create Reports
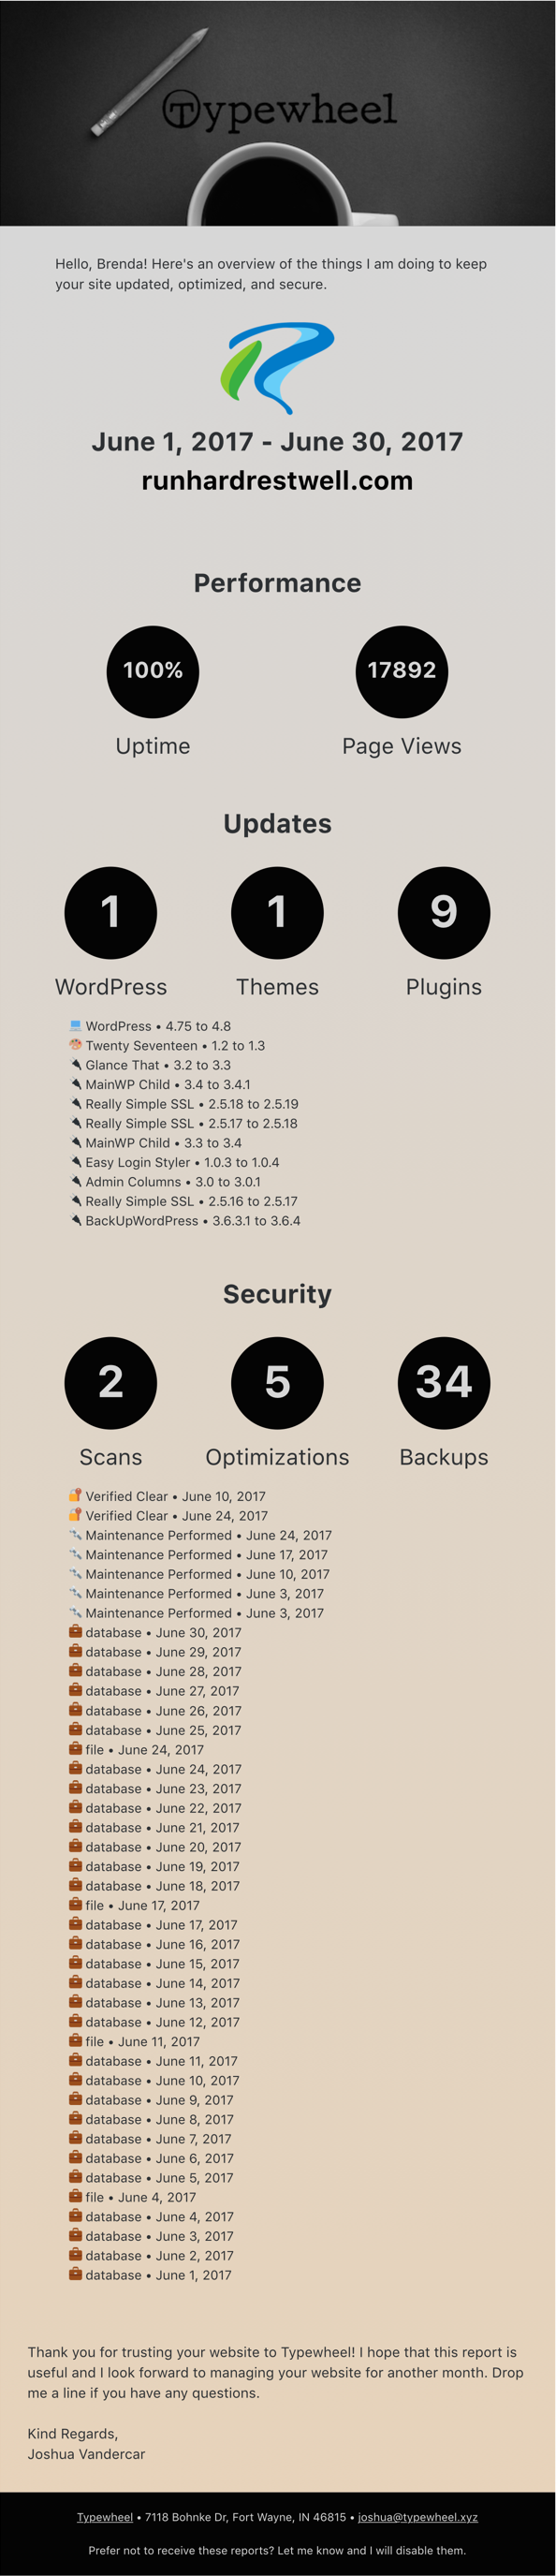
You can see a sample report created by MainWP here:

You can, however, choose to create your report completely from scratch. However, before you start creating reports, pay attention to the next step.
Replicate, or copy, each of the default reports. This is crucial because it means you can keep a copy of the default report for future reports. Replicate the original for each client.
With each report, you have the option to create a one-time report or recurring reports.
However, before you create your client report …
While you might choose to create a report as a sample so you know how to make a report, before you start creating reports for your clients, you need to take inventory of the things you want to report.
You know what is more important to your clients. Are they interested in Uptime? Include that in the report. Do they want to know what you update? Add that as well. Maybe your client can care less what kind of theme you have installed.
Make a list of the things you want to report, then document the tokens you need to include those in the report.
You will need to fill in the report settings for each report you create.
Up until now, it has mostly been a plug and play system, but you may have noticed the reports seem a little bland. Maybe you would like to add a little style to your report.
Joshua has done a great job of showing you how to style a report. He even provides the HTML he uses. All you have to do is copy it in your editor and make the necessary changes. He details in his article.
The report editor is the basic WordPress editor. With a little creativity, you can create your own styling. I will discuss that later in the post.
While the Client Report doesn’t come looking stellar out of the box, it does provide for some really good customization options so that your report doesn’t look like anyone else’s. That option is up to you.
The MainWP Client Report extension allows you to add tokens into the report from the Tokens Menu and the Sections Menu.
Joshua explained that to make some of the tokens work, you will need to have the corresponding extension installed. In other words, if you include a token in your report for which you do not have that extension installed (ie. backups), the report will not report that data.
The structure of the report is much like a regular template. You have a header, body, and a footer. Each section is customizable meaning you can repurpose your header for each report you use. You will see a place where you can save your section at each section.
The first part of the report structure is the Header. Just like a website, this contains all the important information you want to include up front. You may choose to include a title for the report, your company’s name, logo, your client’s name and logo, URL of both, date of the timeframe, and anything else pertinent.
Using the WordPress editor it is easy to include assets like a branded banner, insert tokens to pull up that information, and a customer’s logo like in Joshua’s report.
The Body area is where you will include the detailed information about your client’s site based on the information you are including in the report.
With a little creativity, you can include sections and images for each section using the tokens and the WordPress editor. Further, you can add some additional HTML to display the information in an easier to read manner.
The footer area is where you include information you would like to include in the footer of each page.
Before we wrap this up, I wanted to mention a few additional things to consider. Remember, if you want a custom styled report, you will need to create it using HTML. You can easily use the existing Visual Editor in the MainWP Reports Extension, but you may want to add some additional styling.
It makes sense to dive in the first time and begin tweaking the initial report when you first start learning, especially if it suits your learning style, but when it comes time to create your client report, you should consider determining your report layout and structure. You may go with the very simple, but you also might want to make it a little more stylish and easy to read.
How do you do this? Well, how do you do that for a website? Do you open Photoshop and start creating, or are you an in-browser designer? The thing to keep in mind is that your template will need to be HTML.
Use an HTML Template
As in the old days of web development, crack out the old HTML template. You may have one you used some time ago or one you can download. Keep in mind, you are going to drop the HTML into the WordPress Editor for the reports.
WYSIWYG Editor
Pull out a WYSIWYG editor. They are still available. You can find them online or download one. Don’t be afraid to use tables because you may need those to adjust your layout.
I added the TinyMCE Advanced plugin to my MainWP install making it easy to add tables so that I could create layouts.
Another option is to create your report in something like Word or Google Docs and use the Convert to HTML option to generate the code.
Create a report in another WordPress install
Here is another option. Create your report in another WordPress install and copy the code over to the Client Reports Extension. You add something to help you create a layout. As long as you are using HTML for the styling, you move that code over.
Once you have the layout in your reports editor, you can drop the tokens into the right place.
Code your report layout
Here you can go old school if you like. Pull out your favorite code editor and start writing HTML code to create your layout.
Reporting is an important part of your customer service process. Letting clients know what you do for them can go a long way to providing a long-term relationship with your client. With the MainWP client report feature, you can customize reports to fit your clients’ needs.
With the MainWP Client Report, you can customize your report as much as you want or keep it as plain as you want. Starting off, you may want to keep it simple. Remember, the extension will only report for the child sites which you have the MainWP Client Report Plugin installed and for the duration in which it has been installed.
Have you created MainWP client reports? Drop comments below and let us know.
Manage Unlimited WordPress Sites from One Dashboard!